Leveraging Playwright reporter APIs to create powerful custom reporters

2024-05-22 18:30:00 UTC
Playwright offers a variety of built-in reporters for test result visualization. Even though these reporters can help us in most cases, we may still need custom solutions tailored to our specific project requirements. Thankfully, Playwright allows us to build our own custom test reporter from scratch. This allowed us to create our own custom reporter - NeetoPlaydash. In this blog, we'll dive into the process of creating a custom reporter that perfectly suits our needs.
Before diving deep into building custom reporters, we need to understand the hierarchy in which the test cases are arranged. The diagram below gives a pictorial representation of the hierarchy of the suites.

Root Suite: The top-level suite in the hierarchy represents the entire test suite for the projects. It serves as the root node from which all other suites branch.
Project Suites: Under the root suite, there is a project suite for each TestProject. A TestProject is a logical grouping of tests that belong to the same project or application.
File Suites: Each project suite contains file suites, one for each test file in the project. A test file suite groups together test cases that are defined within a single test file.
Test Cases: Within each file suite, there are individual test cases that represent specific test scenarios or functionalities. Test cases contain the actual test logic, including actions and assertions.
Described Test Suites: Additionally, within test files, test cases may be organized into described test suites using the test.describe() function. Each described test suite represents a group of related test cases.
Test Cases within Described Suites: Within each described test suite, there are test cases that belong to that suite. These test cases are organized under the described test suite and are executed within the context of that suite.
To begin, we'll create a class that implements the Reporter interface provided by Playwright. This class will serve as the foundation for our custom reporter and will contain reporter methods for handling various events during test execution.
// reporter.ts

import type {
  Reporter, FullConfig, Suite, TestCase, TestResult, FullResult
} from '@playwright/test/reporter';

class CustomReporter implements Reporter {
  constructor(options: { customOption?: string } = {}) {
    console.log(`My custom reporter setup with customOption set to ${options?.customOption}`);
  }

  onBegin(config: FullConfig, suite: Suite) {
    console.log(`Starting the run with ${suite.allTests().length} tests`);
  }

  onTestBegin(test: TestCase) {
    console.log(`Starting test ${test.title}`);
  }

  onTestEnd(test: TestCase, result: TestResult) {
    console.log(`Finished test ${test.title}: ${result.status}`);
  }

  onEnd(result: FullResult) {
    console.log(`Finished the run: ${result.status}`);
  }
}
export default CustomReporter;
In the code snippet given above, methods onBegin, onEnd, onTestBegin and onTestEnd are called the reporter methods. Within each reporting method, we'll define the logic for capturing relevant information about the test execution. This could include logging test names, statuses, durations, or any other custom data we want to include in the report.
Understanding the reporter lifecycle is crucial for building custom reporters.
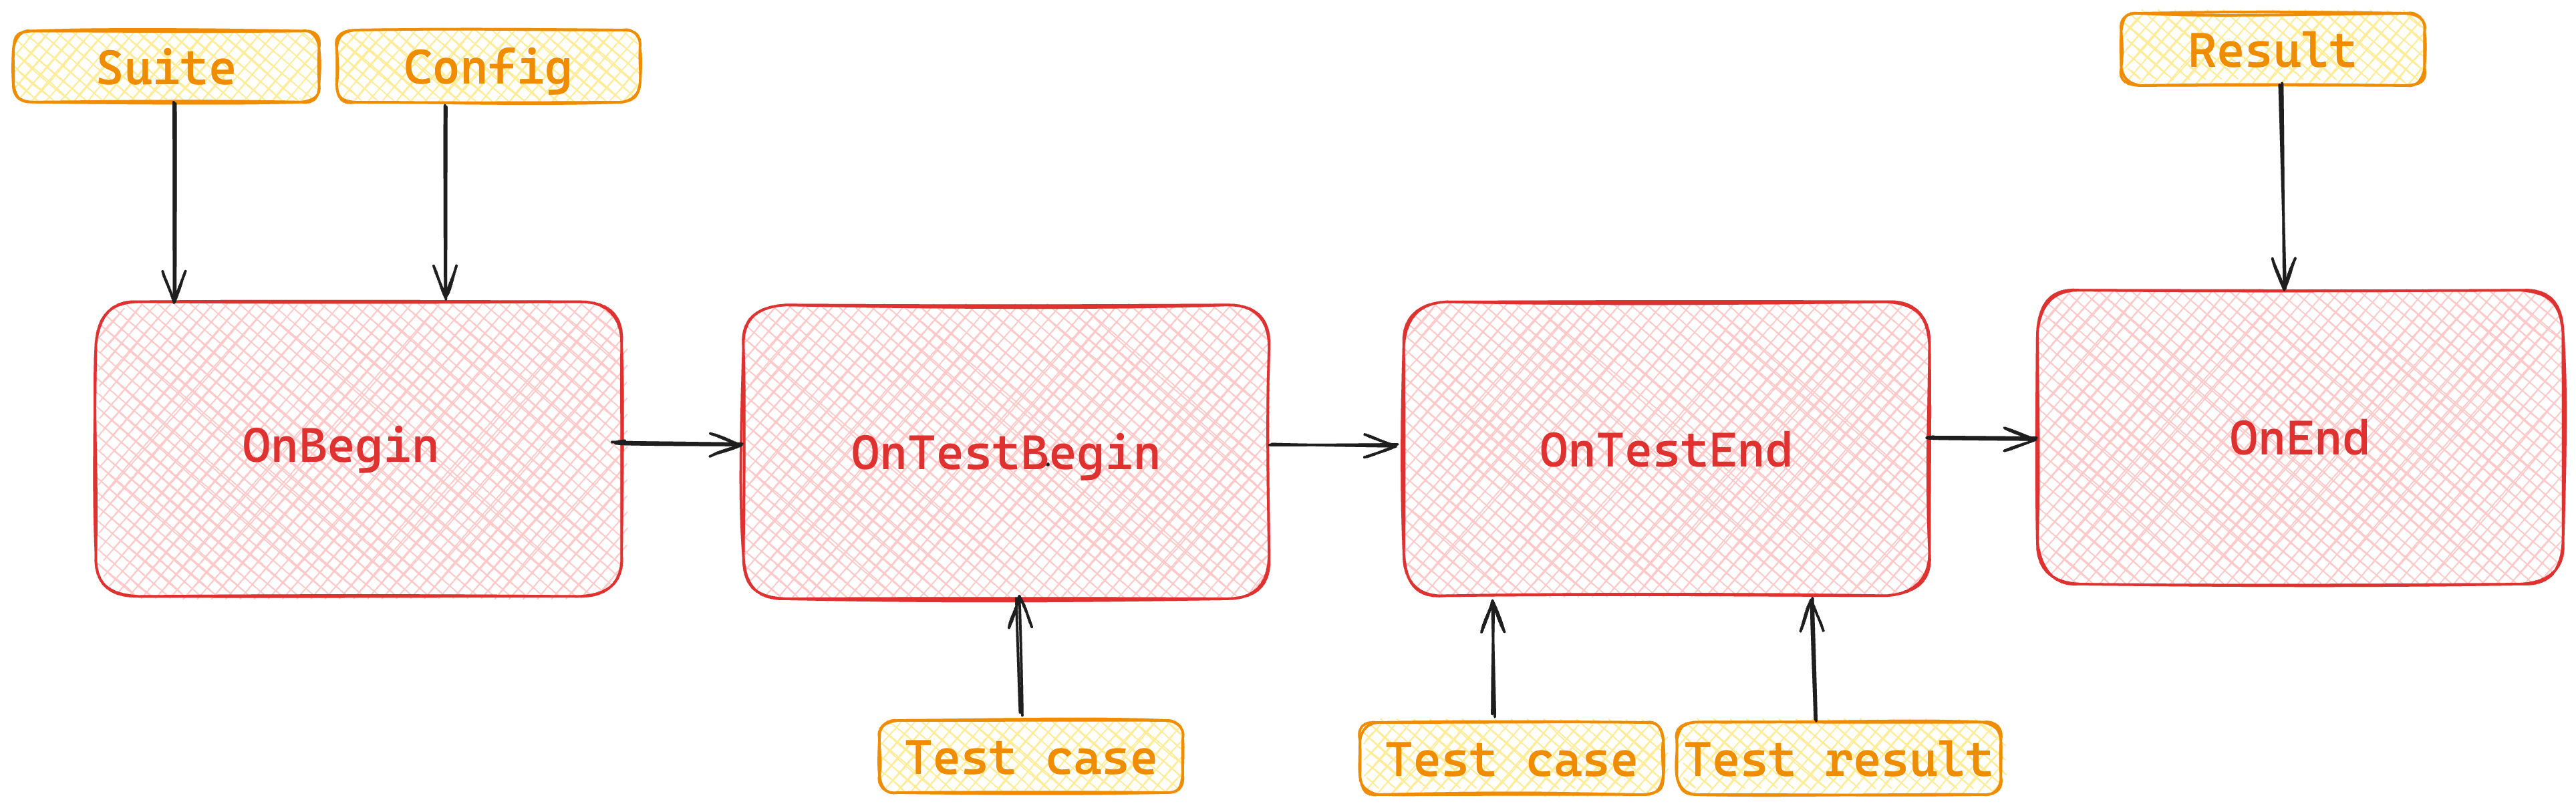
onBegin: Called once at the beginning of the test run. This is where the reporter can perform any setup tasks, such as logging the start of the test run or initializing data structures to store the test results. This method is guaranteed to execute once on every test run. It receives two arguments:
config: This argument contains the configuration settings for the test run, such as browser options and test timeouts.
suite: This parameter represents the test suite being executed. It contains information about the structure of the test suite, including the hierarchy of test cases and any nested test suites.
onTestBegin: Called before each attempt of a test. Here, the reporter can perform actions specific to the beginning of each test, such as logging the start of the test or initializing data for tracking the test execution. It receives two arguments:
test: This argument represents the test case that is about to begin execution. It contains information about the test, such as its title, description and any associated metadata.
result: This argument is an object that stores information about the test result. It may include properties such as the test status, duration and any additional data related to the test execution.
onTestEnd: Called after the completion of each test attempt. At this stage, the reporter can capture information about the test execution, such as the test status (passed, failed, skipped), duration, and any other relevant data. It receives two arguments:
test: This argument represents the test case that has just completed its execution.
result: This argument is an object that stores information about the test result.
onEnd: Called once all tests have been executed and the test run is complete. This is where the reporter can perform any cleanup tasks, summarize the test results, and generate the final report. This method is guaranteed to execute once at the end of each test run. It receives a single argument:
-
result: This parameter is an object that contains information about the overall test run result. It includes the following properties:
status: Contains the status of the test run which can be"passed" | "failed" | "timedout" | "interrupted"startTime: The start date-time of the test run.duration: Contains the total duration of the test run and any additional data related to the test execution.
One thing to note about all these methods is that Playwright doesn’t wait for the completion of one method to move to the next one. So if we have a long-running onTestBegin and a short onTestEnd block then there is a chance for the onTestEnd block to run to completion before the onTestBegin block. So dependent data should be handled carefully.
One way to tackle this issue is to wait for the completion of any pending promises within the onEnd method. The test run ends only after this method runs to completion.
Apart from the lifecycle methods mentioned above, Playwright offers a few more methods which can prove useful in certain situations.
onStdOut: Called when a test emits stdout output. This can include logging statements or any other output generated by the test script. The reporter can capture this output and include it in the test report for further analysis or debugging purposes.
onStdErr: Called when a test emits stderr output. This typically includes error messages or any other error-related output generated during the test execution. The reporter can capture this output and include it in the test report to provide additional context about test failures or errors.
onStepBegin: Called before each step within a test begins execution. A step represents a single action or assertion within a test case. The reporter can use this method to capture information about the start of each step, such as the step description or any metadata associated with the step.
onStepEnd: Called after each step within a test completes execution. The reporter can use this method to capture information about the end of each step, such as the step result and any additional data or assertions associated with the step.
onError: Called when an error occurs during the test execution that is not handled within the test script itself.
onExit: Called when the test execution process is about to exit, either due to completing all tests or encountering an error. This is another point where we can wait for any pending Promises or actions since Playwright will stop execution, only once this method runs to completion.
Once our custom reporter class is complete, we'll export it from a module to be easily integrated with our Playwright tests.
Finally, we'll integrate our custom reporter with our Playwright tests by specifying it as the reporter when running our test suite. This can be done through the command line interface or by configuring it in our Playwright configuration as below.
// Using the Playwright configuration playwright.config.ts

import { defineConfig } from '@playwright/test';

export default defineConfig({
  reporter: ['./reporter.ts', { customOption: 'some value' }],
});
# Using the command line interface
npx playwright test --reporter="./reporter.ts" # npx
# or
yarn playwright test --reporter="./reporter.ts" # yarnIn the above code snippet, customOption is a custom option passed to a custom reporter in a Playwright test configuration. The need to provide customOption arises when we want to add custom configurations or options to the reporter specific to our use case. These options can help configure the reporter's behaviour without hardcoding values, allowing for greater flexibility and reusability. We can access the same in the custom reporter as below:
export class CustomReporter implements Reporter {
  private customOption: string;

  constructor(options) {
    console.log(options.customOption);
  }
}
We can even extract the logic of the custom reporter and create a reusable npm package. This way, we can easily integrate the reporter into multiple projects without duplicating the code.
By understanding the reporter and its lifecycle in Playwright, we can effectively build and customize reporters to suit our testing needs and requirements, enhancing the overall testing workflow and visibility into test results and leveraging the full power of Playwright.